LiveBinders

LiveBinders Help

System Requirements

Accounts

"LiveBinder It" Bookmarklet

Tabs, Sub Tabs, and Base Tabs

File Management

Adding Content

Binder Settings - Access, Colors, Naming, Deleting

Sharing LiveBinders

LiveBinder Shelves

Download a Binder

More

Other questions? Contact us at support@livebinders.com


Browser Support

You must have JavaScript turned on in your browser in order to see the contents of a binder. If the binder opens, but none of the content loads, please check your javascript settings.(Please note, this is Javascript, not Java.)

For PC users, LiveBinders is compatible with Firefox 40 and higher, Safari 4.0.5 and higher, Chrome 30 and higher, and I.E. 9.0 and higher.

For Mac users, LiveBinders is compatible with Safari 6.0.0, Chrome 30 and higher, and Firefox 21 and higher.

For Chromebook users, LiveBinders is compatible with Chromebooks 55.0.2883.103 (64-bit) and higher.

We also have apps for the iPhone, iPad, and Android.

Other Requirements

While not a requirement, we suggest that you add the "LiveBinder It" bookmarklet to your browser, which lets you add web pages to a new or existing binder while you are browsing the web. Learn more about "LiveBinder It" here or go to the LiveBinder It page to add it to your browser page to.

Change Your Password, Preferences, and Email Address

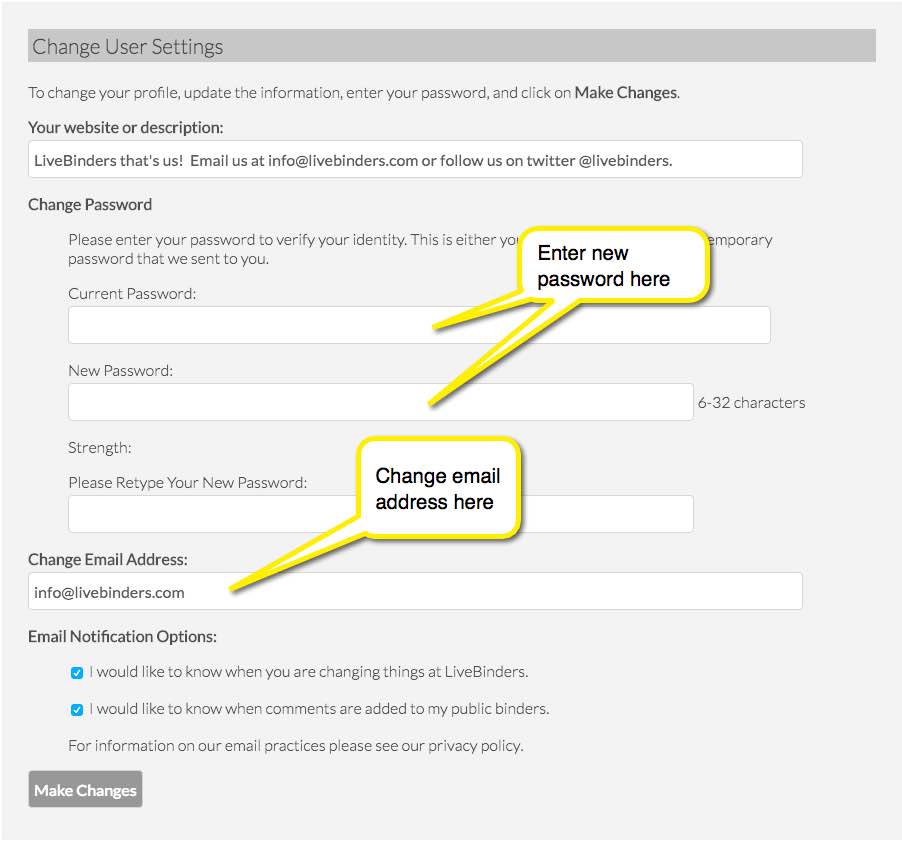
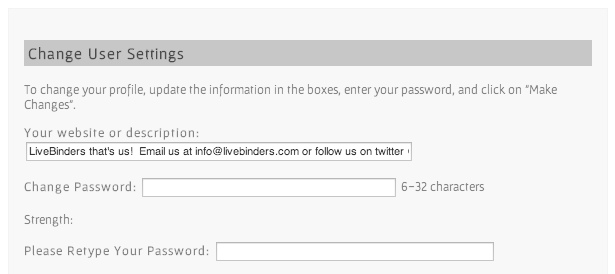
To change your email preferences or email address, just click on your username at the top of the page. You will see a form with your current address and preferences. You can change any of the options shown, but you will need to enter your password again to make the change.

screenshot of clicking on username

screenshot of change password

Add Your Description/URL and Picture to Your Account

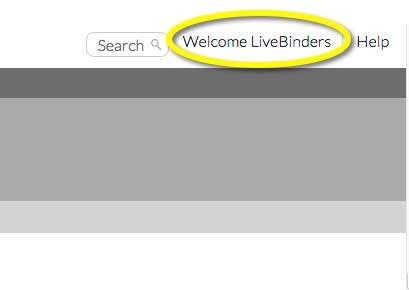
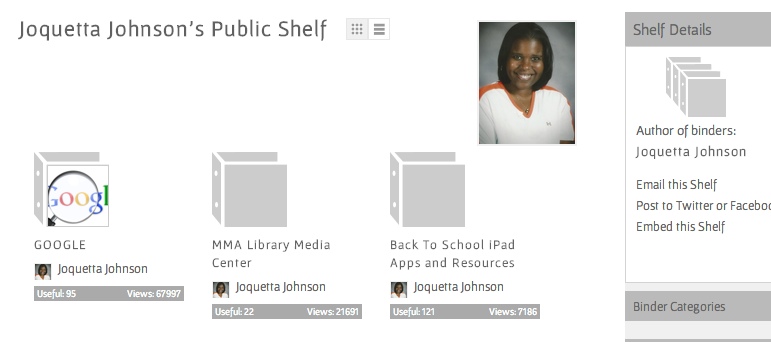
Your description and picture can be added on your account information page. To access this page, click on your username in the upper right. You will see selections where you can type your description/blog address and upload your picture.

showing your description

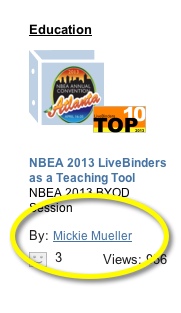
Your description and/or picture will show up whenever someone clicks on your name as a binder author:

clear a link

Sign up a student with a teacher or parent email

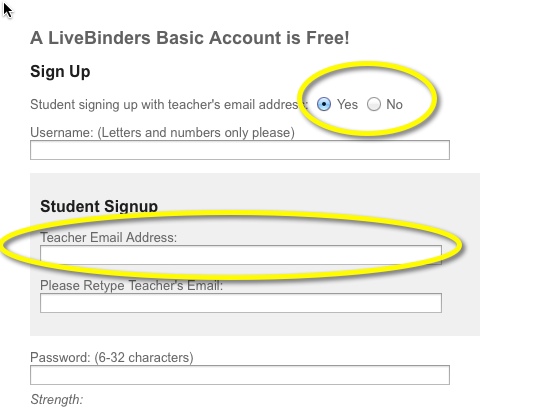
Students may sign up for LiveBinders using a teacher or parent's email. If the student forgets their password, an email will be sent to the teacher or parent's email address.

If you, as a teacher, already have a LiveBinders account, you may want to use a different email address for your student sign-ups. This is just in case the student enters your email address in the retrieve password box instead of their username.

student sign up page

If your student forgets their password, they should enter their username in the student section of the retrieve password page.

student retrieve password page

If your student will be collaborating with other students on a binder, the email they will need to use will be a combination of your email and the student username. For example, if your email is teacher@domain.com, than the student's email (for collaboration purposes) will be teacher+studentusername@domain.com.

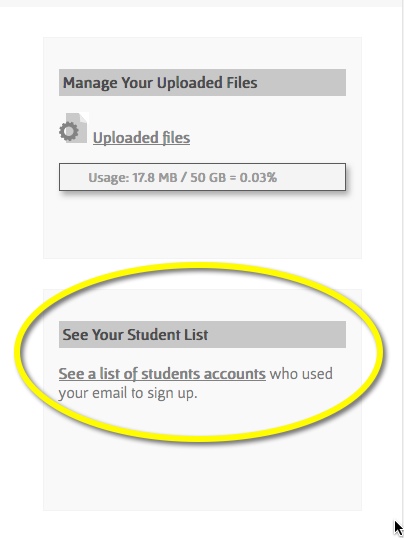
You can see a list of your student names by going to your profile page (click on your username in the upper right corner) and then clicking on See a list of student accounts.

link on profile page to student list

Delete Your Account

Just send an email to support@livebinders.com with your username in the email. If you are not using the email address that you signed up with, we will need a confirmation from your sign-up email address. Your account and all associated binders will be removed ASAP.

Please feel free to share with us the reason for deleting your account. We deeply appreciate the feedback!

Change or Cancel Your Account Subscription

Please fill out this form to change or cancel your LiveBinders subscription.

Bookmark to a Binder - Adding to Binders While You Browse

You can add web pages while you browse the web through our LiveBinder It feature. It is a bookmarklet tool that you add to your browser toolbar so you can add web pages that you find to a new or existing binder - without ever leaving the page.

About the "LiveBinder It" Bookmarklet


Bookmarklet in IE

"LiveBinder It" is a bookmarking tool that you can add to your browser toolbar. While you are browsing the web, you can add web pages directly into one of your binders or into a new binder in your account by clicking on the LiveBinder It link. This way, you can add pages without having to go to the LiveBinders site. It is a quicker and easier way to add web pages to your binders.

Adding "LiveBinder It" to Your Browser

The <strong>LiveBinder It</strong> page will have specific instructions for your browser. This video provides an overview for installing on most modern browsers:

Adding "LiveBinder It" Bookmarklet to an iPad

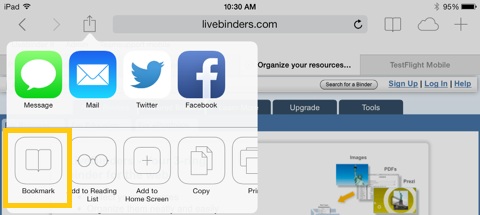
There are two ways to add "LiveBinder It" to the iPad. One is to add it on to Safari on your Mac and then sync your bookmarks with the iPad. Here is an explanation of how to sync your bookmarks from your Mac to your iPad.

The second option isn't easy, but it will add the LiveBinder It feature to your iPad. Hopefully Apple will soon come out with a better way to add bookmarklets!

screenshot of ipad - where to add bookmark
  1. In Safari, click on the square with the arrow icon at the top of your browser
  2. Click on the Add Bookmark
  3. For the name, type in Livebinder It
  4. Click on Save
  5. Click on the bookmark icon
  6. Click on Edit in the top right corner of the bookmarks menu
  7. Click on the LiveBinder It bookmark
  8. Under LiveBinder It, copy and paste the following:

    javascript:var%20w%20=%20window.open('http://www.livebinders.com/media/add_url?url='+encodeURIComponent(location.href)+'&description='+encodeURIComponent(document.title),'LiveBinders',%20'scrollbars=0,status=0,resizable=1,location=0,toolbar=0,width=850,height=700');(function(){setTimeout('w.focus()',1000);})();

  9. Click on Done on the keyboard.

Saving Sites Without Using "LiveBinder It"

If you can't use the "LiveBinder It" bookmarklet because of your school's policy, there is another way to add links.

If you haven't already created a binder than,

  • Go to the tab Create Binder
  • Look for the link under that tab that says Start a Blank Binder
  • Fill out the form
  • When you click on Create New Binder you will be inside your binder
  • You can copy and paste links into the yellow area that says Enter URL:
  • You can change the tab names by just typing in them

Tabs, Sub Tabs, and Base Tabs

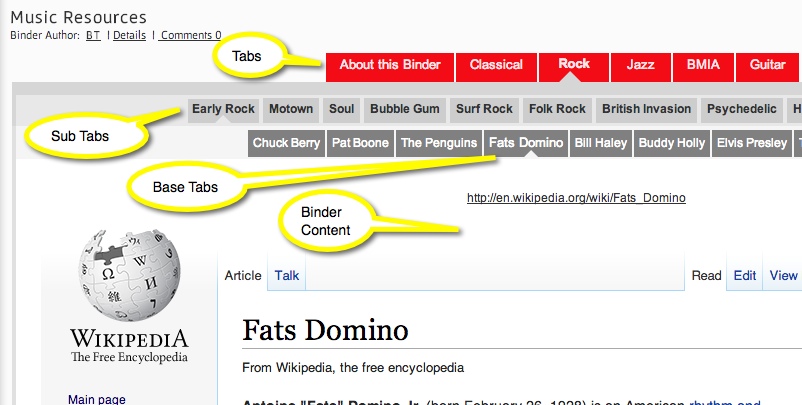
Tabs organize content in a binder. A binder contains many web pages, or documents, where each web page/document is represented by a tab. For example, a binder with 20 tabs has a total of 20 web pages inside.

You can add more than one page to a tab by adding sub tabs. If you have an upgraded account, you can add base tabs to your sub tabs for a third level of content. Sub tabs are just another layer of tabs in a binder and can be added to an existing tab. When you click on a sub tab you open another page. Sub tabs are located in the grey area underneath a selected tab, as you can see below.

If you want to add more content to your sub tabs, you will need base tabs. Base tabs add a third layer of tabs in a binder can and be added to any existing sub tab. When you click on a base tab you open another page. Base tabs are located in the grey area underneath a selected sub tab, as you can see below. Base tabs are only available to our subscribers.


screenshot of tabs in a binder

Edit a LiveBinder

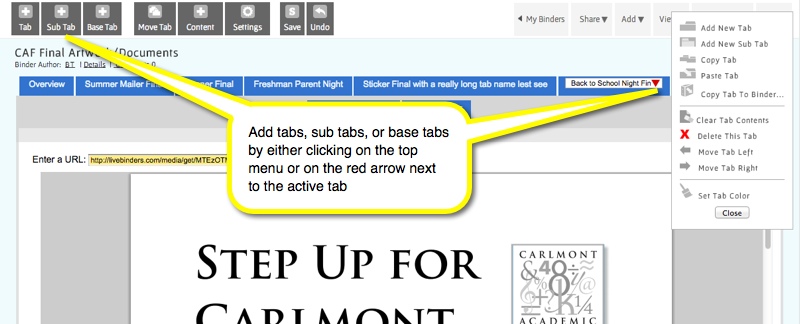
After logging in, select the binder you want to edit. You can either click on the yellow Edit button from your My shelf or click on the Edit icon (the binder with a pen) in the top bar once you are inside the binder. When you are in Edit mode in your binder, you can add, rename, and delete tabs as well as insert new URLs and upload other content. See the screenshot below on how to add tabs:

add tabs and sub tabs by either clicking on the top menu options or the yellow arrow next to the tab

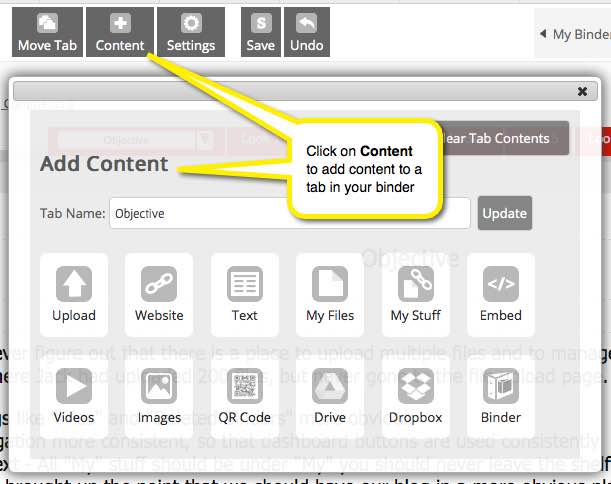
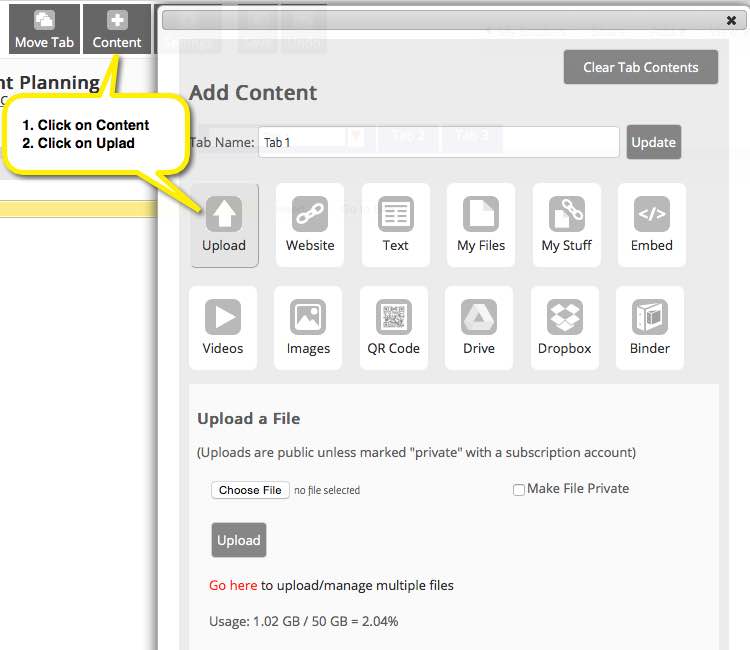
To add content to your binder, click on the Add Content button.

add links, upload files, add other content, set text layout

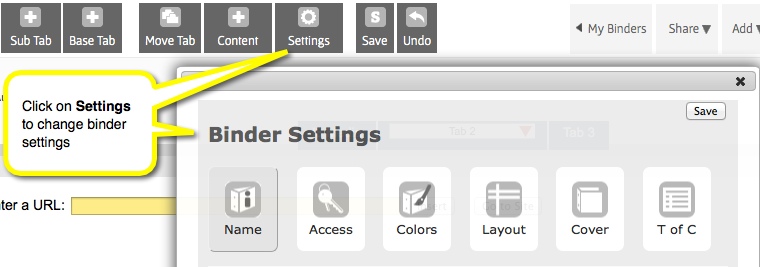
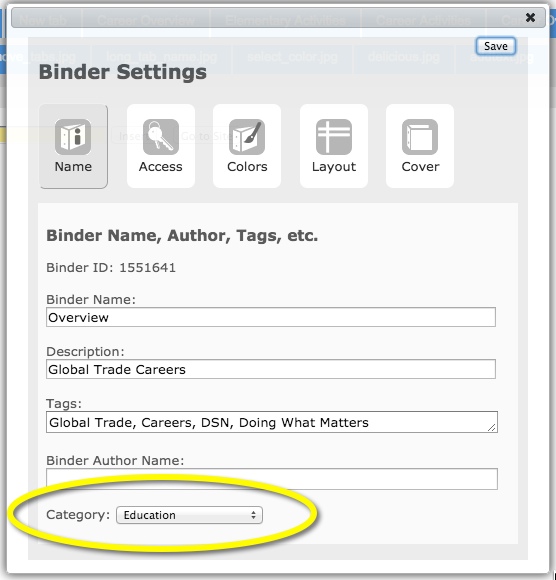
To change binder information such as its name, description, and default tab color, click on the Binder Settings button.

change Binder Settings

Rename a Tab

Log in to your account. Select the binder you want to edit from the My page. Open the binder in Edit mode and double click the text area of the tab or sub tab you want to rename and type the desired name.

screenshot of changing tab name

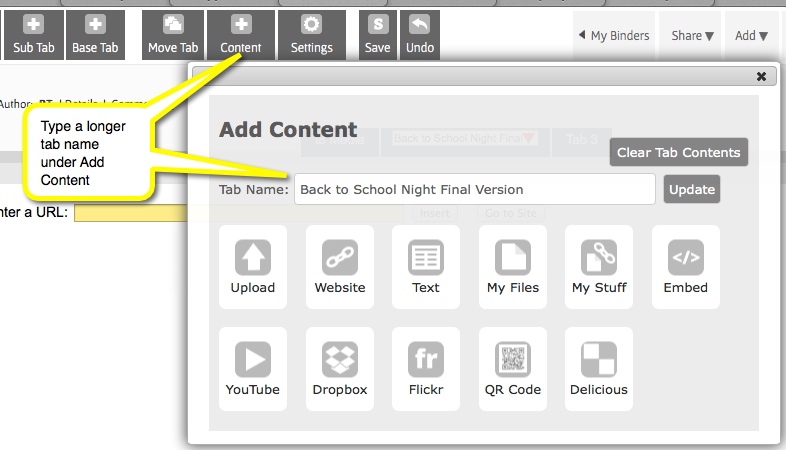
To type a longer tab name, click on Add Content and type in the box there.

screenshot of larger field for changing tab name

Moving and Copying Tabs, Sub tabs, and Base Tabs

Log in to your account and select the binder you want to edit from the My page.

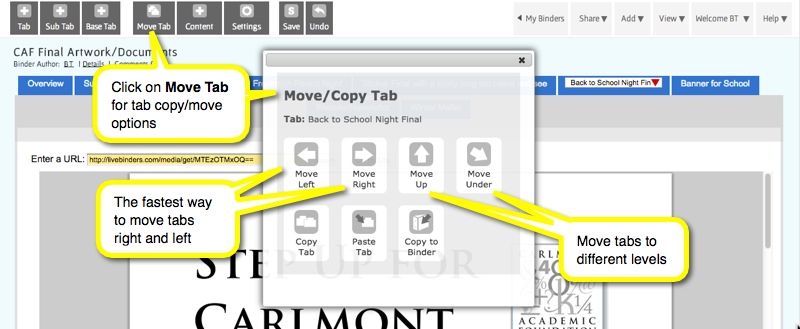
Then select the tab that you want to move or copy, then click on the Move Tab button. Select the action you wish to take. You can do the following from the Move/Copy Tab menu:

  • Move a tab left - Move Left (click multiple times to move multiple positions)
  • Move a tab right - Move Right (click multiple times to move multiple positions)
  • Move a sub tab to a main tab, or a base tab to a sub tab - Use Move Up
  • Move a main tab to a sub tab or base tab - Use Move Under and then select the target destination
  • Copy a tab
  • Paste a tab - move to the tab before the destination before pasting
  • Copy a tab to a different binder - Use Copy to Binder
screenshot of how to move tabs

Change the Color of a Tab

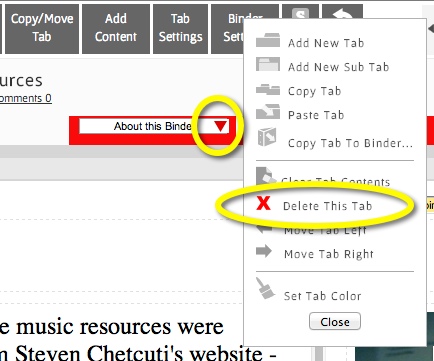
Select the tab that you want to color, then select the tab's pull-down menu by clicking on the red arrow next to the tab title.

screenshot of how to change tab color

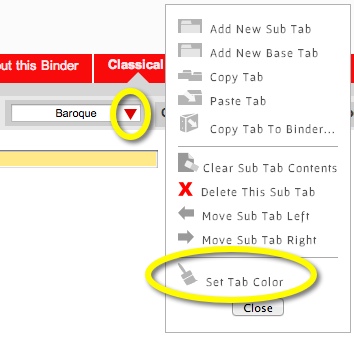
Select a color and click Apply.

screenshot of selecting tab color

Note: You can change a sub tab color or a base tab color but you won't see the change until you move to another tab.

Delete a Tab

Select the tab, sub tab, or base tab that you want to delete. Click on the red arrow next to the tab name. Select Delete from the pull-down menu and then confirm the deletion in the pop-up window.

screenshot of how to delete a tab

Adding Text to a LiveBinder

  1. Go into your binder in Edit mode
  2. Go to the tab where you would like to add text and click on the Add Content button in the toolbar at the top of the page
  3. Click on Text
  4. Select a layout with all text or a combination of media and text by clicking on the desired layout button
  5. Then click on Click Here to Edit in the desired text pane and start typing
adding text to a tab in a binder

Reuse Content From Other Binders

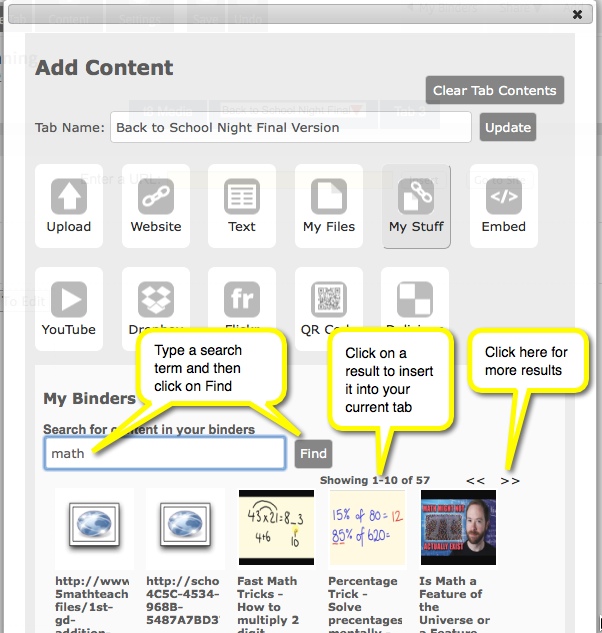
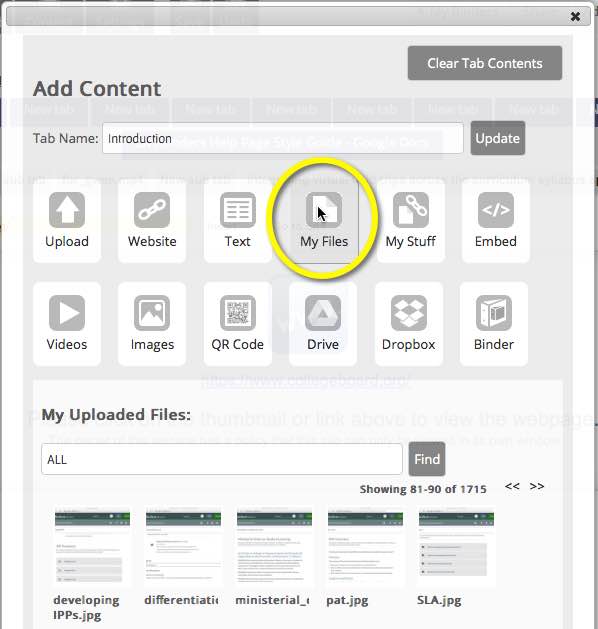
LiveBinders keeps track of every page in your binder. If you want to re-use web pages or files from a previous binder:

  1. Go to a new tab and select the Add Content button in your binder
  2. Click on My Stuff
  3. The default search term is "ALL" (all in Capital Letters) which will bring up all your content, or you can type in your own search term
  4. Click Find

Results will display with the most recent first.

All my LiveBinders content

Upload a File to a Binder

To upload a single file, log in and open the desired binder in Edit mode.

  1. Click on the Add Content button in the upper left of the binder
  2. Click on Upload
  3. Click on the Browse or Choose File button to find the file on your desktop
  4. Click Upload

There is currently a 5MB file size limit on file uploads for the free version of the product. You can upgrade to upload larger files.

Please note: Uploaded files are public in the free version of the product. Our subscription version offers private uploaded documents. You can upgrade to upload private files. To learn more about Document Security for your uploaded content, click here.

select 'file upload' in the editor

Note: You can upload any type of file, but Microsoft Office documents will show up a links inside the binder because Microsoft applicatons do not run in the browser. PDF files will show up inside the binder on all browsers. JPG files will also show up inside the binder on all browsers.

If you want to see documents in all browsers, upload your documents to Google Docs. A Google Doc will have a URL that can be added to the binder. Alternatively you can covert documents to .pdf. Recent versions of Microsoft Office offer output to .pdf. There are also several PDF conversion tools found in this binder:

Collaborator Upload

If both the binder owner and the collaborator are subscribers, the collaborator can upload their file to the binder owner's account. This is the default for our subscibers. This box can be unchecked if uploading to the owner's account is not desired.

select 'upload file to binder owner account' in the editor

Upload Multiple Files

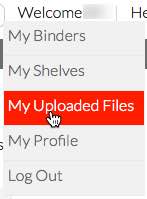
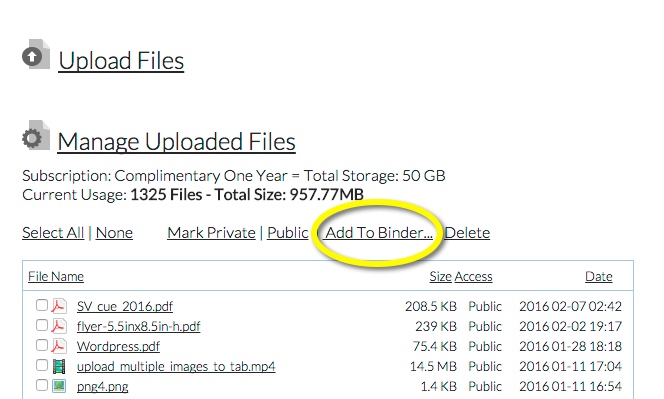
To upload multiple files do the following:

  1. Mouse over your username in the upper right corner and select My Uploaded Files.
  2. Upload files on the dashboard
  3. You will be taken to the file upload page. On this page you can manage your uploaded documents and upload multiple documents.
  4. To upload multiple documents, click on the Upload Files link and then click on the Add Files button or drag your files into that box.
  5. Once your upload is complete, you can add the files to your binder by checking them in the Manage Uploaded Files section, then clicking on Add To Binder... This will open an instance of "LiveBinder It" that will allow you to add those files to any of your binders.

  6. Add to binder option

Inserting Uploaded Files

There are two options for inserting multiple files:

  1. Insert the files from the file manager using "LiveBinder It"
  2. Insert the files from inside the binder using Add Content

Number one above works well if you are inserting the files in a new binder or if you want them to all be inserted at the end of the binder or tab. Here is how to use that feature.

If you need a more interactive insert, than number two is your best option. It will let you go from tab, to sub tab, to base tab, inserting files where you need them.

To use this feature, do the following:

  1. Go into your binder in Edit mode
  2. Click on the first tab where you want your first file inserted
  3. Click on Add Content
  4. Click on My Files
  5. Search for the files (if you just uploaded them, using the "ALL" search will bring up the most recent first)
  6. Click on the desired file to insert it in the current tab
  7. You can move from tab to tab leaving the menu open and inserting the files.
Uploaded files in the binder

Insert Uploaded Files as Links

Note: Do not insert private files as links. Private files must be opened inside the binder to maintain document security.

There may be occasions where you prefer to have your uploaded files show as links instead of showing up as content in the tab or sub tab. Here is how to do that:

  1. Use the multiple file upload to upload your files, but don't insert the files from the file manager
  2. Go back into your binder in edit mode and go to the desired tab
  3. Switch to a text-only template (one or two column text) on a tab or sub tab by clicking on Add Content then Text and selecting a layout that says "Text"
  4. Do not click in the text box
  5. Click on My Files
  6. Search for the files (if you just uploaded them, using the "ALL" search will bring up the most recent first)
  7. Click on the desired files to insert them as links in the current tab
  8. Each file will show up as a link. You can change the text on the link to make it more descriptive by clicking in front of the link and typing. Once you type the text, you can delete the remainder of the link.
Uploading files as links

Clear a Tab

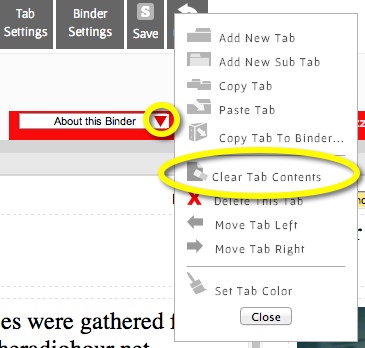
To clear the contents of a tab, but not the tab name or color, do the following:

  1. Click on the tab with the content that you wish to clear
  2. Then click on the red triangle that brings up the tab menu
  3. Select Clear Tab Contents from that menu
clear a link or a document from a tab

Add an Image

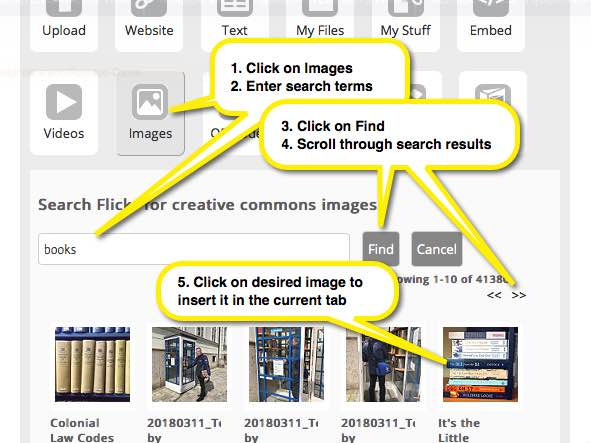
When you have a tab with subtabs it is sometimes nice to add an image to the tab so that it is not blank. We let you search the Flickr database for images that you are allowed to use.

  1. Go to the tab, in Edit mode, where you want the image.
  2. Click on Add Content > Images
  3. Use a search term to search for your desired image. Use the ">>" to scroll through the results
  4. Click on the desired image to insert it in the current tab
screenshot of 'Finding a Flickr Image'

Change a Binder Name

Log in to your account. Open the binder you'd like to change from the My page by clicking on the yellow edit button below the binder.

  1. From inside the binder, click on Settings
  2. You will see the binder name. Type a new name in that box
  3. Click on Save at the top of the Binder Settings menu

Change Your Binder Cover

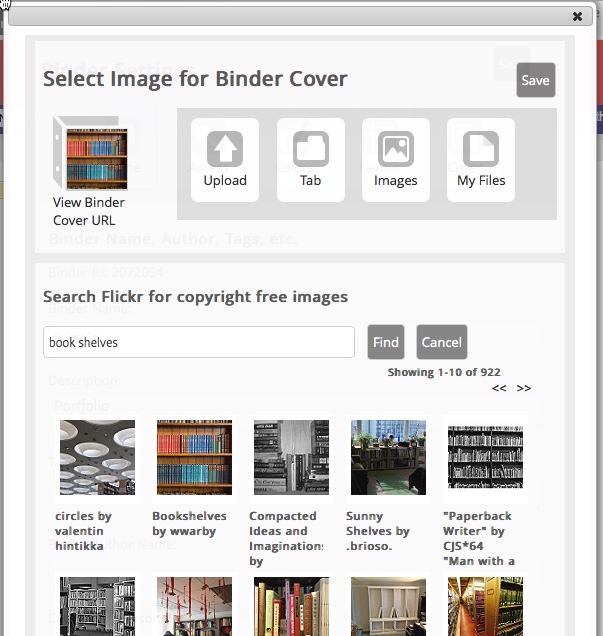
You can use an image for your binder cover using one of these methods:

  1. Use a current tab for your binder cover. It needs to be either an uploaded .jpg, .png, or .gif image; or a Flickr/YouTube image inserted with our search tool under Add Content.
  2. Upload a .gif or .jpg image. The image does not have to be any particular size, but it works best when it is square.
  3. Use our search tool to find an image on Flickr, YouTube, Dropbox, or in content that you have already uploaded.

Go into your binder in Edit mode. If you are planning to use a tab for the binder cover, go to that tab. Click on Settings at the top, then click on Cover. You will see a menu with the three options.

  1. If you want to use the current tab as a binder cover, just click on Use Current Tab. The content in the tab needs to be either an uploaded image or a Flickr or YouTube image imported through the Add Content menu.

  2. screenshot of 'Select Image for Binder Cover'
  3. If you want to upload a file for your cover, please make sure of the following:
    • The file is an image, either .jpg, .gif, or .png
    • You have copyright authority to upload the image
    • The image is mostly square in shape (equal height and width)
  4. Click on Upload. Select a file from your local computer and click on Upload. You should see your binder cover change.
  5. You can also use an image from Flickr's creative commons library. Just click on Images and use a search term to search for an image. When you find one you like, just click on the image and it will be inserted as the binder cover. You can also do this with a YouTube search by clicking on Videos. If you have an image from another binder that you would like to use, you can search for that image using My Files.


Embed a YouTube Video

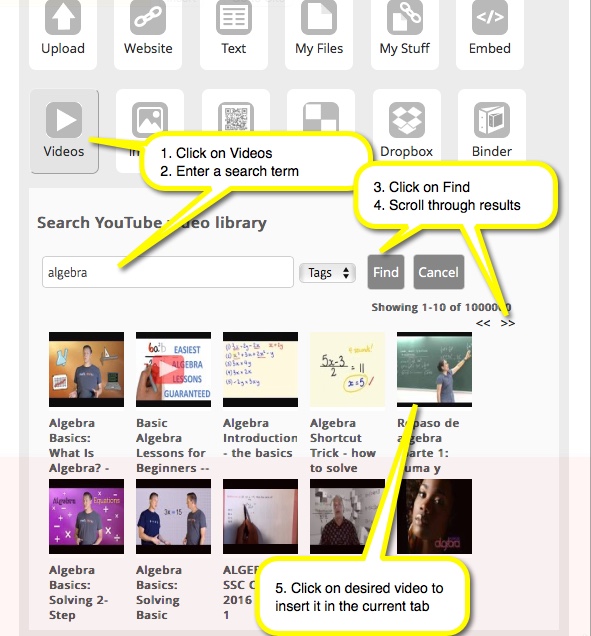
You can simply insert the link for a YouTube video in the binder and it will show up embedded in that tab. Optionally you can search for YouTube videos within LiveBinders:

  • Click on Add Content
  • Click on Videos
  • Type in a key word to help you find the video
  • When you find the desired video, click on the video icon and it will be inserted in your current tab
screenshot of 'Finding a YouTube Video'

Embed a Dropbox Document

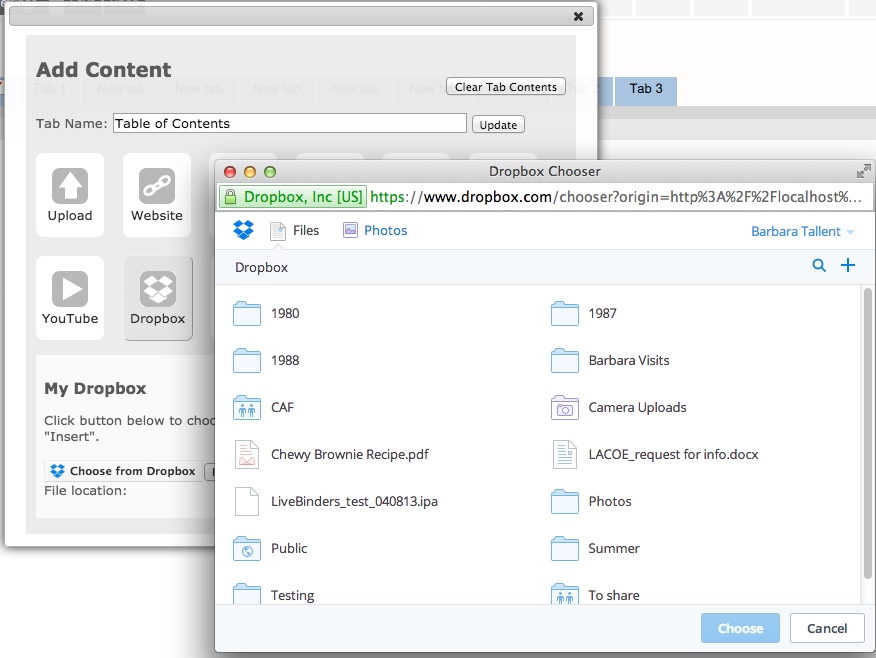
Note: Dropbox recently changed their policy and pdf documents will now show up as downloads instead of embedded in the binder. If you want pdf documents embedded in the binder, you can upload them directly to LiveBinders or use Google Docs or Box.net.

You can easily add documents from Dropbox by going to the tab where you would like the document and then:

  • Click on Add Content
  • Click on Dropbox
  • You will need to sign into your Dropbox account
  • Locate the desired file in Dropbox
  • You can then use one of the buttons to insert the document in the existing tab, a new tab, or a new sub tab
screenshot of 'Embedding a Dropbox document'

Embed a Facebook Timeline

  1. Go into your binder in Edit mode
  2. In a new tab, go to Facebook's plugin page.
  3. In the Facebook interface add your facebook URL and customize the widget, you will see a preview of the widget below the options. Once it looks the way you want it, click on the Get Code button below the widget.
  4. A popup with two boxes of code will be shown on your screen, copy the code in the first box
  5. Go back to your tab with your binder and go to the tab in the binder where you want the Facebook timeline to be embedded
  6. Click on Add Content
  7. Click on Embed
  8. Paste the first group of embed code there
  9. Go back to that Facebook tab and copy the code in the second box
  10. Go back to the binder and place that second set of code in the box right after the first set
  11. Click on Insert below the embed code box
  12. It will take a minute and then you will see a link. When you are in Edit mode you will only see a link, but if you view your binder in play mode you will see the embedded timeline

Embed a Twitter Timeline

  1. Go into your binder in Edit mode
  2. In a new tab, go to Twitter's Publish page.
  3. In the Twitter interface add your twitter URL and click Enter
  4. Select the embedded timeline
  5. You will see a preview of your timeline, You can click on "set customization options" if you want to change how it looks.
  6. Click on Update
  7. Click on Copy Code
  8. Go back to your tab with your binder and go to the tab in the binder where you want the Twitter timeline to be embedded
  9. Click on Add Content
  10. Click on Embed
  11. Paste the embed code there
  12. Click on Insert below the embed code box
  13. It will take a minute and then you will see a link. When you are in Edit mode you will only see a link, but if you view your binder in play mode you will see the embedded timeline

Embed a QR Code

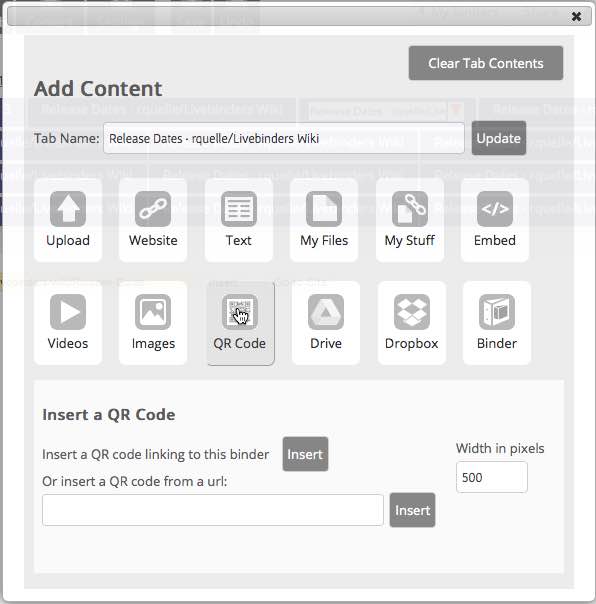
You can embed a QR code for the current binder or for another site. This is often convenient when you are giving a presentation and want to give your audience a link on the projector.

  • Go to a new tab
  • Click on Add Content
  • Click on QR Code
  • To add a QR code for the current binder, click on Insert on the line Insert a QR code linking to this binder
  • To add a QR code to a different URL, type the URL in the box and then click on Insert next to the box
screenshot of 'Embedding a QR Code'

How to Use Embed Codes from Other Products

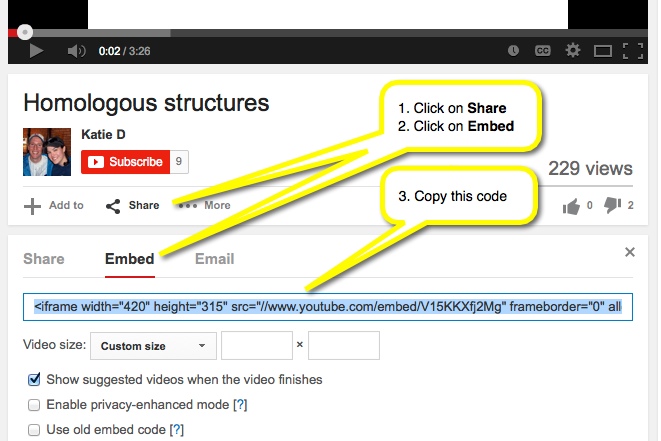
Many multimedia products offer embed codes so that you can embed them right in your binder. Examples include YouTube, Prezi, and Slideshare. To use embed codes from these products, first find the embed code on their site and copy it.

  • Go to a new tab in your binder
  • Click on Add Content
  • Click on Embed Code
  • Paste the embed code in the box
  • Click on Insert
  • Close the Add Content window to see the content embedded in the tab
screenshot of 'inserting embed code'

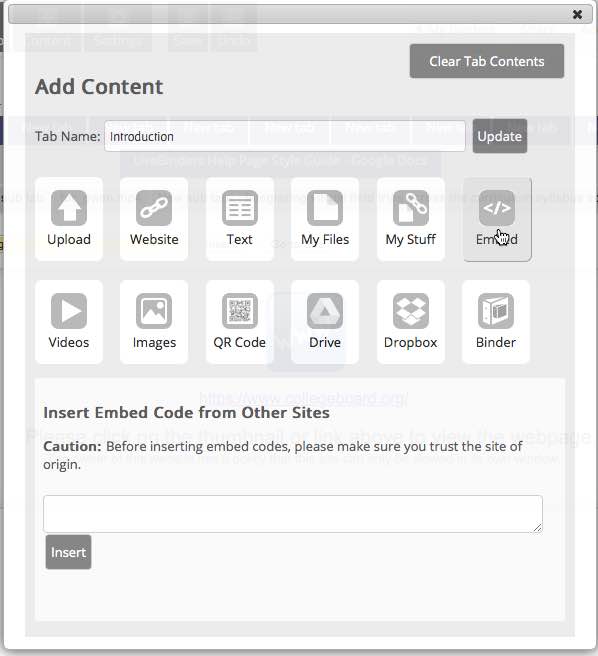
Here is an example of grabbing embed code from YouTube:

Images in Text

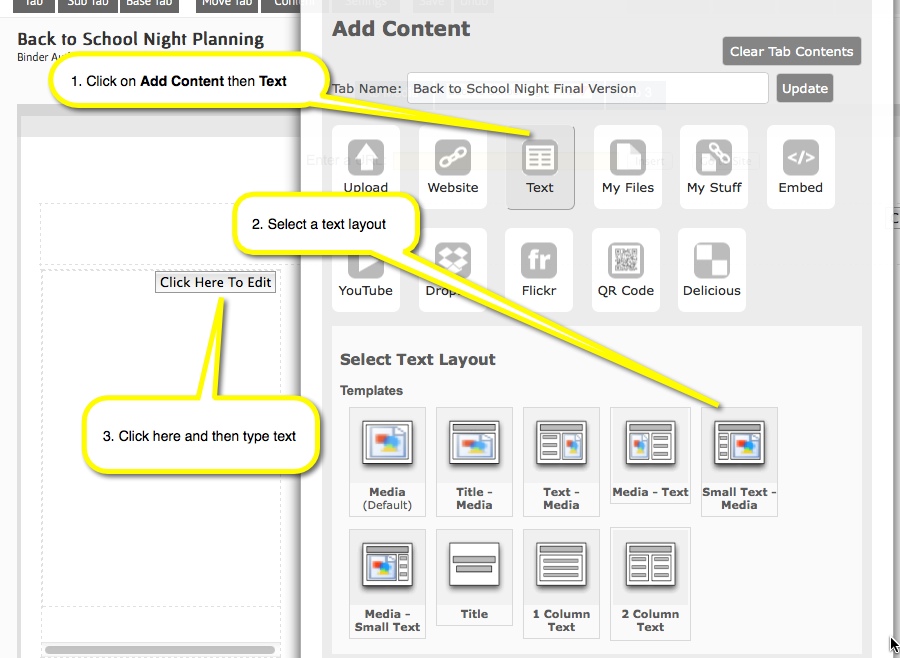
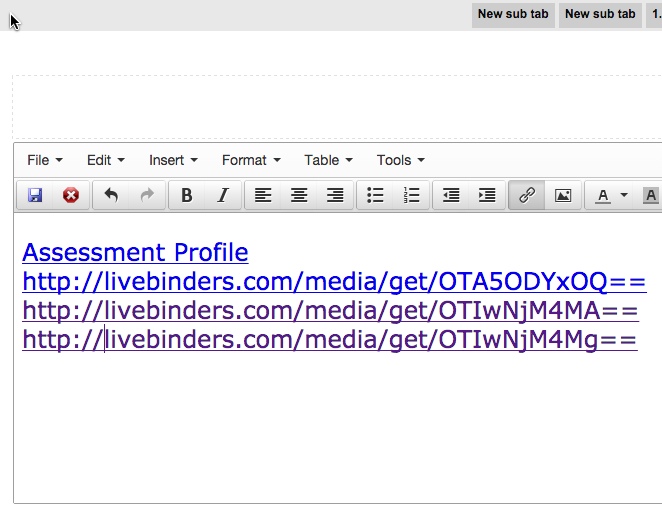
If you need to have an image in a text frame, please follow the steps below:

  1. Create a temporary tab
  2. In the temporary tab, click on Add Content then Upload
  3. Upload the file from your computer. You will see the file and a URL at the top
  4. Enter URL box
  5. Copy the URL from the box that says Enter a URL:
  6. Go to your destination tab in the binder and click on Click Here to Edit
  7. Click on Insert then Insert image
  8. Tree icon in toolbar
  9. Paste the URL in there and click on OK

You should see your image in the text. You can continue to use the same temporary tab for other images and then just delete it when you are done.

Links in Text

In addition to having a web page show up in LiveBinders, you can also link to web pages.  To do this you will need a text template:

  1. Click on "Add Content"
  2. Click on "Set Text Layout" 
  3. Click on a template that includes text.
  4. When you click in the text box, you can type some text
  5. Highlight the text and click on the link icon at the top of the text box.

To link to documents that you are uploading do the following:

  1. Click on "Add Content"
  2. Click on "Set Text Layout" 
  3. Click on a template that includes text
  4. Click on "Upload"
  5. Upload your document and it will show up as a link in the text box
  6. Continue uploading documents this way until you are done
  7. When you are done, highlight the links in the text editor and click on the link icon above the text to change the name of the link

Embed a Binder or a Shelf

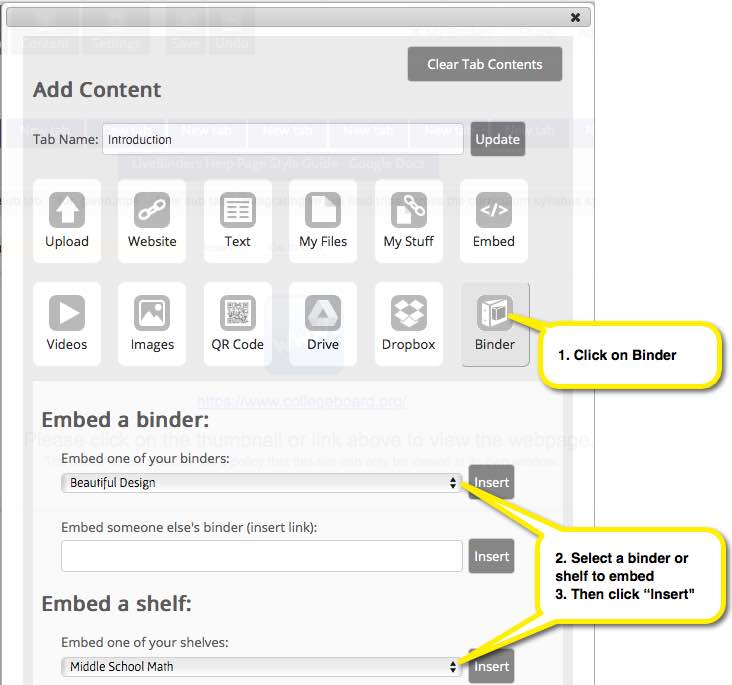
There are many reasons why you might want to insert a binder in a binder including:

  • An infinite number of tab levels
  • Mixing private content with public content to control viewing access
  • Breaking your content into smaller groups
  • Speeding up the loading of a very large binder
  • Referencing someone else's collection of content on your subject

Shelves are also a great way to collect binders and you can insert a shelf in a binder from the same menu.

To embed a binder or shelf:

  1. Click on Content
  2. Click on Binder
  3. You can select one of your own binders or shelves from the dropdown menu
  4. Or you can copy/paste a link from someone else's binder
Embed binder or shelf menu

Automatic Title Page and Table of Contents

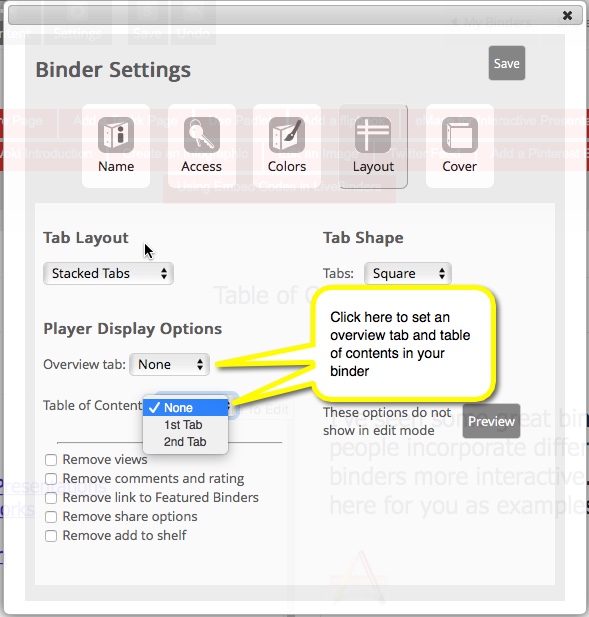
LiveBinders can automatically display a title page with your binder title, cover, and description as the first or second page. You can also have LiveBinders automatically insert a table of contents that will be updated automatically as you change things in your binder.

Just go into your binder in Edit mode and click on Binder Settings > Layout and then select the tab where you would like to see your title page or table of contents.

Select title page or table of contents

Removing comments, view count, useful count, and links to other binder from inside the LiveBinder

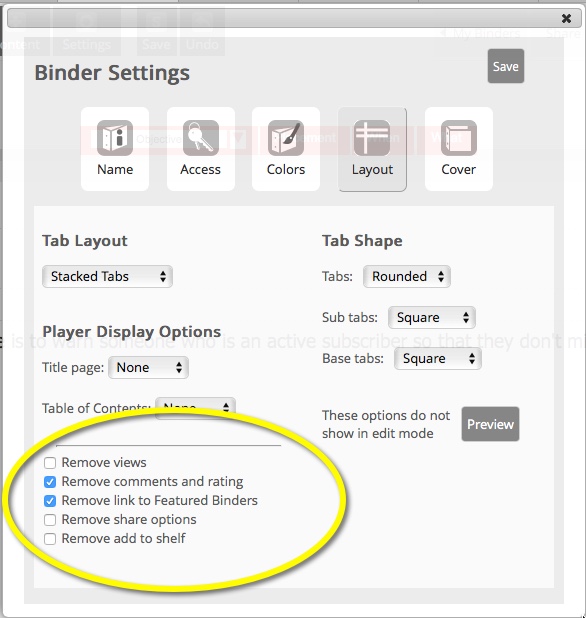
LiveBinders provides links to other binders, comments, and counts inside the binder where other viewers of the binder can see them. You may not want these options on your binder and if you are a subscriber, you can remove all of these options.

To remove these items, just go into your binder in Edit mode and click on Binder Settings > Layout and then click on the checkboxes of the items you would like to remove from the view of your binder.

Remove links and options from play mode

Removing url link above the content

URL above content

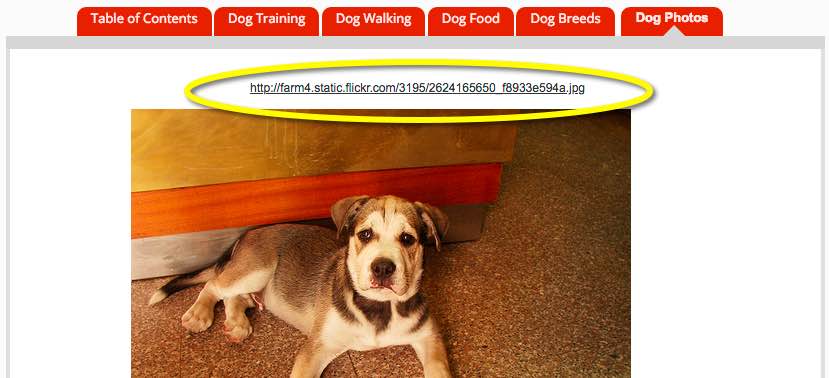
When you upload content or add a webpage, LiveBinders shows a link to that content so that someone can click on that link and view the content outside of the binder. If you don't want to have these links in your binder and you are a subscriber, you can remove them.

screenshot of menu to change setting

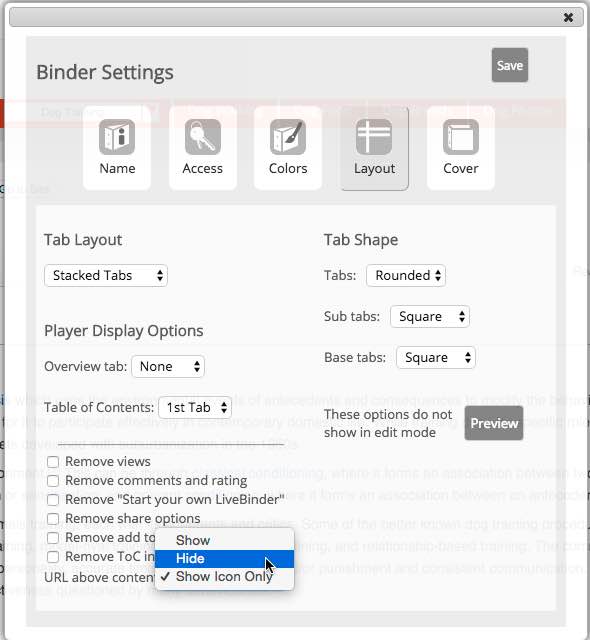
To remove the links above the content or replace them with a simple icon, just go into your binder in Edit mode and click on Binder Settings > Layout and then click the pull down URL above the content and select the option that you want:

  1. Show - Show the url above the content (this is the default behavior)
  2. Hide - Hide the url completely, viewers of your binder will not be able to view the content outside the binder
  3. Show icon only - A small icon (pictured below) will be displayed instead of the url, allowing viewers of your binder to view the content outside the binder

Note that your selection will be for all links in the binder.

Note that mobile devices need the capability to open content outside the binder, so if you select 2 or 3 the icon will show on mobile devices.

icon instead of url

Add a Google Site to a binder

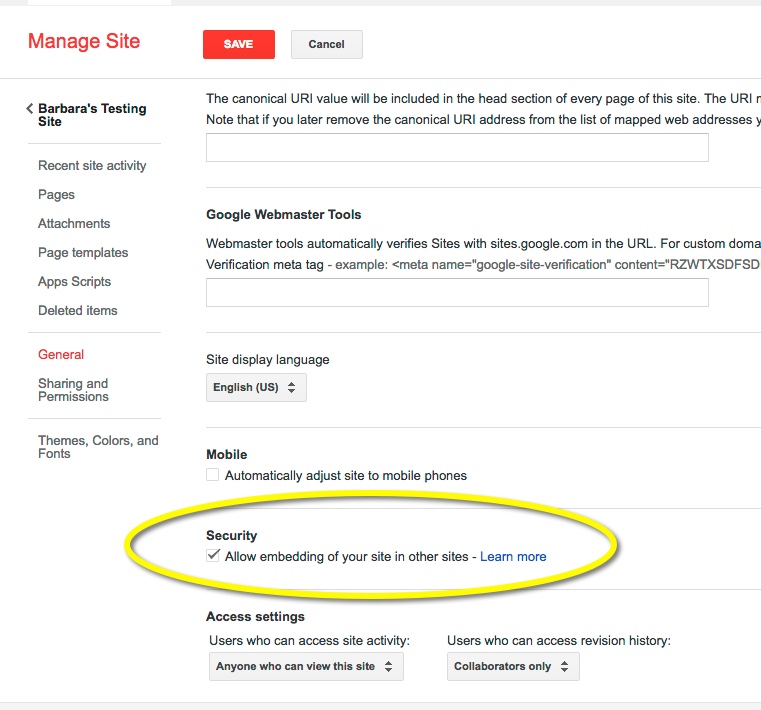
Google recently changed their policy so that Google sites will not sit in an iframe unless specifically granted permission. Here is how you grant permission for your google site so that it will work in LiveBinders:

  • From within your Google Site click the More Actions button (cog icon)
  • Select Manage site
  • Under "Security" (scroll down), check the box next to Allow embedding of your site in other sites
  • Click Save

Your Google Site can now be added to your binder with the link.

Checkbox for Allow embedding of your site in other sites

Change Binder Categories

  • Log in to your account
  • Open the binder in Edit mode that you would like to change from the My page
  • Click on the Binder Settings button
  • Under Binder Name, Author, Tags, etc. scroll down to the Category drop down menu
  • Use the drop down to select the appropriate category
  • Click on Save at the top of the Binder Settings menu
screenshot of how to change category of binder

LiveBinder Details

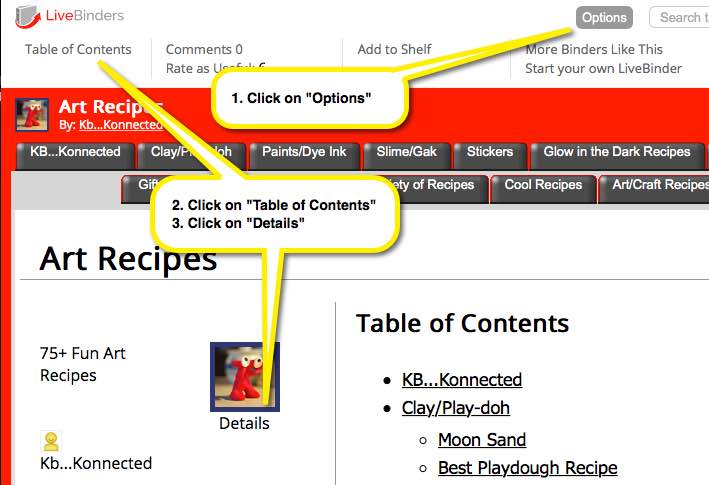
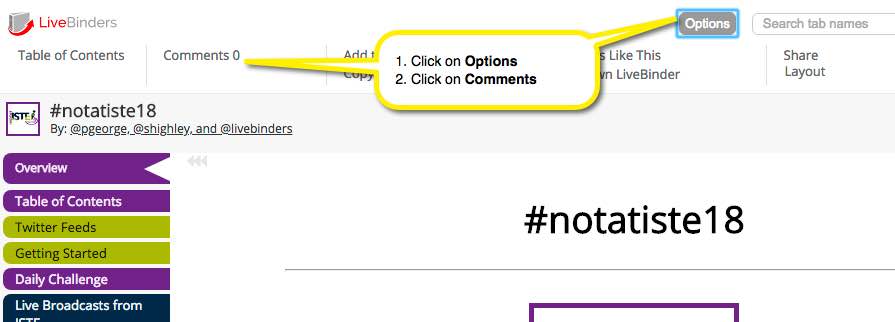
You can find out the date a binder was created, view the description, and see how many people have viewed the binder by selecting Details from the Options menu located next to the name of the binder.

screenshot of 'Details' from the options menu

If you are inside binder, you can find out more information about the binder by clicking on the Options button then clicking on Table of Contents then clicking on Details link. This detail page will have information about when the binder was created, when it was last edited, and all tabs in the binder and their links.

screenshot of Details link in a binder

Change Binder Colors

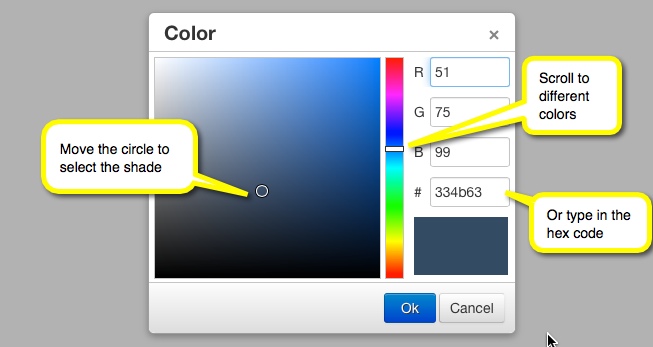
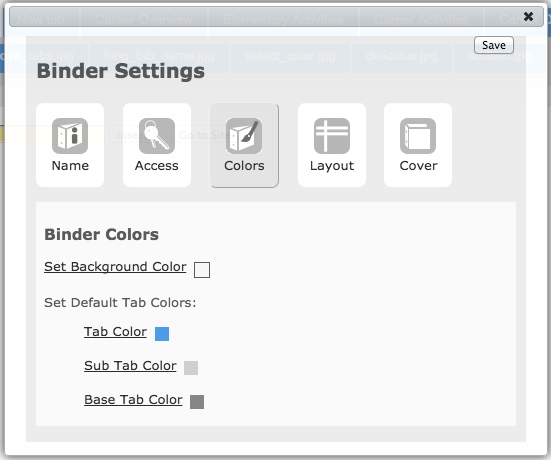
You can change a binder's background color and default tab color from the Binder Settings menu under Colors. To change individual tab colors, use the red arrow pull-down menu next to the active tab.

screenshot of color selection

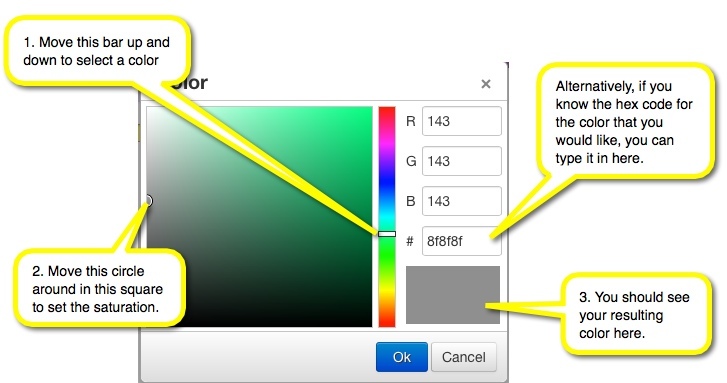
How to use the color selector:

color selector

Binder Author Name

Your username will show up by default as "Binder Author" inside the binder and on the shelf. You may want a different name displayed if you are collaborating with others on a binder or if you want to use your real name instead of your username.

To have a different name appear on your binder do the following:

  1. Go into your binder in Edit mode
  2. Click on Settings
  3. Type the desired name into the Binder Author Name box
  4. Click on Save

Your new name will now appear as the binder author.

binder author name under binder settings

Select how the tabs in your binder are viewed

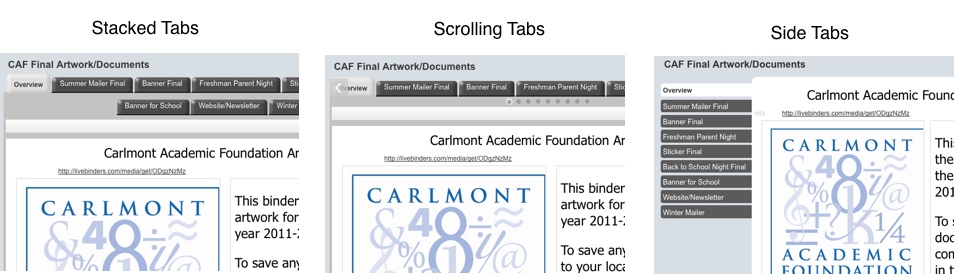
You may want people to view your binder with tabs on the side instead of on the top or, if you have many tabs, you may want to have viewers of your binder use the tab slider instead of the stacked tabs.

To select how your binder will be viewed, go to Binder Settings > Layout and use the drop-down labeled Default Tab View.

Please note that the editor only shows the stacked tab view, but viewers of your binder will see your binder with the layout that you selected.

screenshot of selecting the default tab view

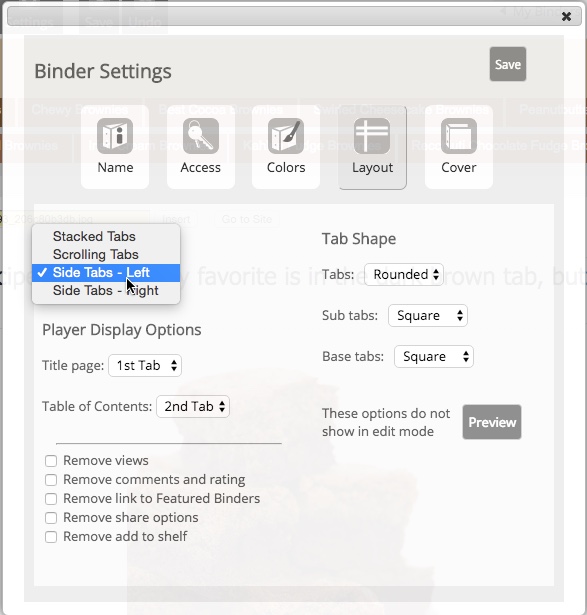
Here are examples of the different tab layouts:

screenshot of different tab layouts

Privacy Settings

  • Log in to your account
  • Open the binder that you would like to change in Edit mode from the My page
  • Click on the Share button at the top
  • The Access section should already be open
  • Use the Access drop down to select the desired privacy setting:
    • Public-Copyable - Anyone can see your binder and copy it. If you have a good reputuation with LiveBinders, it will be listed in the LiveBinders search results and the Google search results
    • Public-Copy Disabled - Anyone can see your binder, but only you can copy it. If you have a good reputuation with LiveBinders, it will be listed in the LiveBinders search results and the Google search results
    • Private-Copyable - Only people that you designate, by giving them the URL and the access code, can see and copy your binder
    • Private-Copy Disabled - Only people that you designate, by giving them the URL and the access code, can see your binder, but only you can copy it
    • Unlisted-Copyable - Only people that have the URL can see and copy your binder, it will not be listed in the LiveBinder search results or google search results - This feature is only available for subscribers
    • Unlisted-Copy Disabled - Only people that have the URL can see your binder, but only you can copy it, it will not be listed in the LiveBinder search results or google search results - This feature is only available for subscribers
      Note - files marked as "private" inside the binder will not be visible in an unlisted binder.
  • Click on Save to save your change before you use the other share options
screenshot of where to change privacy settings

Share a LiveBinder

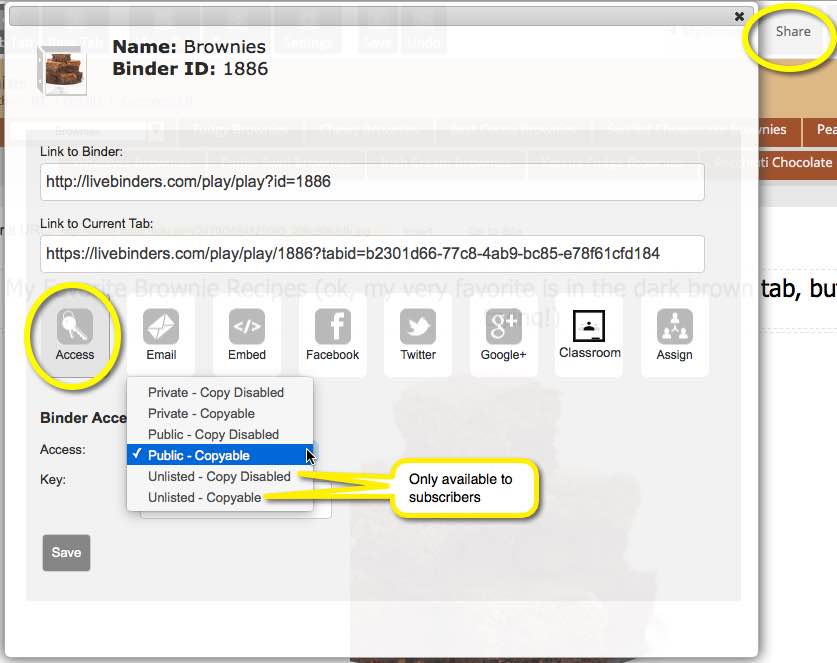
Sharing Public Binders

  1. Go into your binder in Edit mode
  2. Click on the Share link at the top
  3. You may want to click on the Access icon first to make sure your binder is public
  4. You can copy and paste that link into an email message or use the other options listed there to share your binder


Selecting Embed from binder
Using the Share feature from within the binder

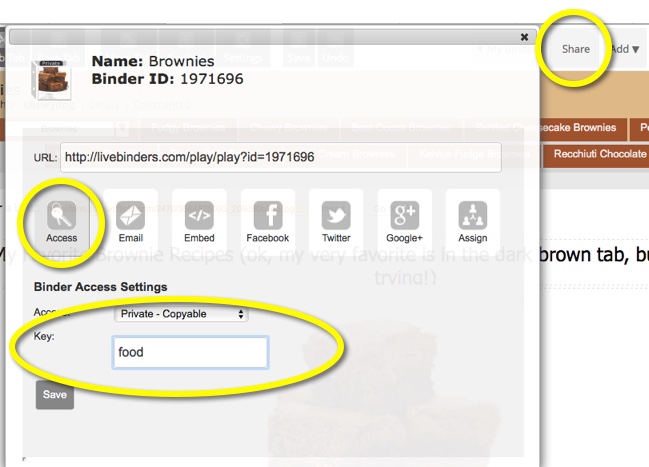
Sharing Private Binders

You can email a single private binder by emailing the binder link to one or more addresses.

Anyone who wants to see the binder will need an access key.

The access key can be a mixture of letters and numbers, no special characters.

The access key is case sensitive.

To enter an access key:

  1. Go into your binder in Edit mode
  2. Click on the Share link at the top
  3. The Access menu should be open, if it is not, click on the Access icon
  4. Type the key(s) in the box and click on Save to save it

Access keys can be phrases with spaces (but not commas.)

You can type in multiple access keys (if you would like different access keys for different people) by separating them with a comma.

Where you type in your access key


How to Share a Link to a Specific Tab

You can send someone a link to a specific tab, sub tab, or base tab in a binder. Here is how:

  1. Go into your binder in Edit mode
  2. Navigate to the desired tab or sub tab
  3. Click on Share
  4. Click on Embed
  5. Copy the link shown under Link to Current Tab
Linking to a specific tab

Share with another LiveBinders member and collaborate

If the person that you are sharing the binder with has a LiveBinders login, you can share a private binder with them and it will appear on their shelf and they won't have to use an access key.

You can also collaborate with people and allow them to edit your binder as long as they all have LiveBinders accounts. They will be able to add and delete tabs and sub tabs, change text/tab names, and edit the binder in every way except for the binder settings and access - only the author can change the binder settings and access.

You can share your binder with another LiveBinders user from the shelf or inside the editor.

From the shelf, click on Options from the mouseover select Share then Assign.

From the editor, click on Share then Assign.

Sharing your binder with other LiveBinders users

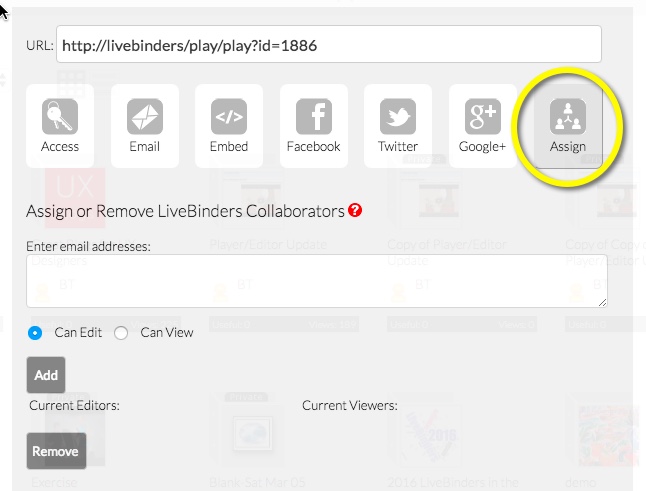
You must know the email addresses of the people you would like to invite to view or edit your binder. These need to be the email addresses that they used to sign up at LiveBinders. Type in those email addresses, with commas separating them, then click on Add.

If you have students who used their teacher's email to sign up for LiveBinders, then the other students will need to use a combination of the teacher's email and the student's username to add them as a collaborator. For example, if the teacher's email is teacher@domain.com, than the student's email (for sharing purposes) will be teacher+studentusername@domain.com.

You can then send an optional email to everyone to let them know that you are inviting them to collaborate.

Note for subscribers: Both the teacher and the student accounts must be paid subscribers to share benefits of full collaboration. Please see about a Team discount.

Embedding a Binder

You can embed a binder onto your blog page, wiki page or website. To do this from within a binder,

  1. Go into your binder in Edit mode and click on Share in the top bar
  2. Click on Embed
  3. Copy the html code provided in the box labeled Embed a Binder Icon:
  4. Paste this code into the html of your website. If you are using a wiki, there may be a special window for pasting embed codes
Selecting embed code

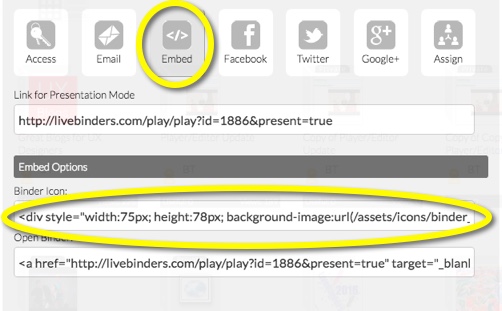
The binder icon will appear like this one on your web page:

Selecting Embed from menu 
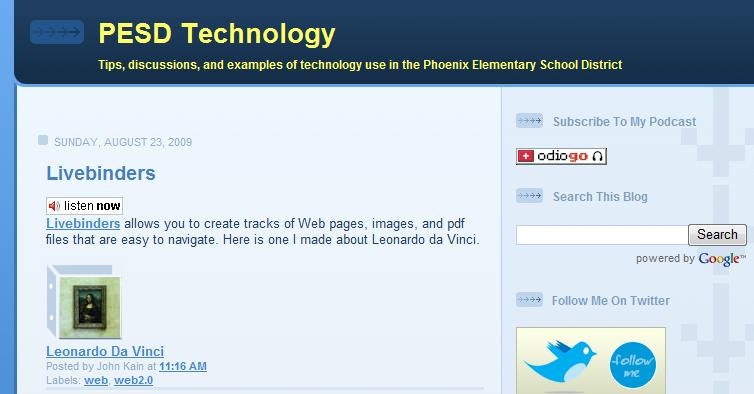
Screenshot of a LiveBinder icon embedded in a blog post.

binders on a wiki page


You can also embed an open binder in a web page. This may or may not look good depending upon how many tabs and sub tabs are in the binder. Binders with fewer tabs and sub tabs look better in a small window than binders with lots of tabs. Just follow the step above, but copy the code from the box labeled Open Binder:

Selection for embedding an open binder

Embedding a Table of Contents to a Binder on Your Website

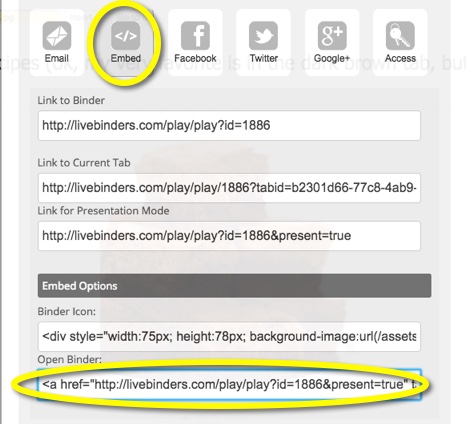
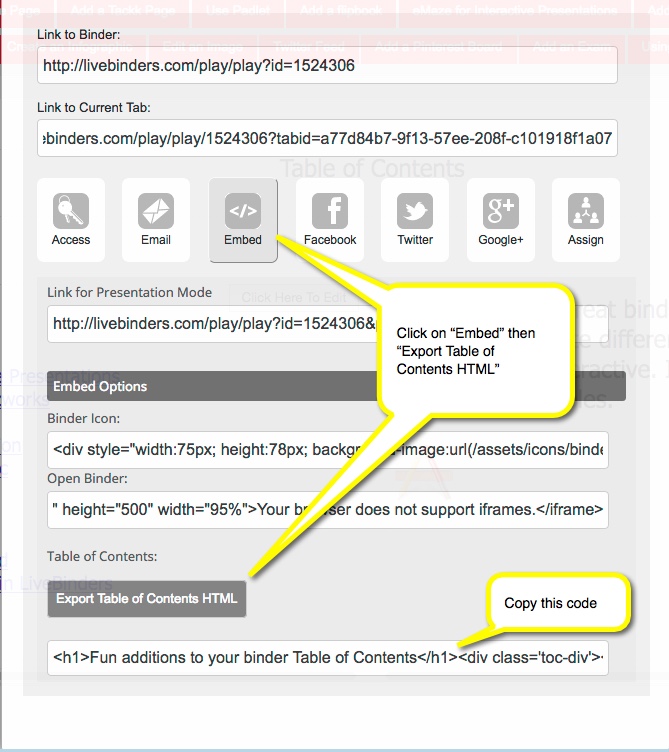
You can embed a table of contents for your binder onto your blog page, wiki page or website. To do this from within a binder,

  1. Go into your binder in Edit mode and click on Share in the top bar
  2. Click on Embed
  3. Scroll down and click on Export Table of Contents HTML
  4. Copy the html code provided in the box below the button
  5. Paste this code into the html view of your website. If you are using a wiki, there may be a special window for pasting embed codes
Selecting embed code for table of contents

A Binder Icon on Your Desktop

You can put your LiveBinder on your desktop by dragging the icon next to the URL to your desktop. See this video on how to put the LiveBinder link on your desktop:

Copy a LiveBinder

You can copy a binder by selecting Copy from the Options menu underneath the binder on the shelf.

If you are inside a binder you can click on the Options button then click on Copy.

The new copy will be added to your My shelf. Mouse over your user name and select My Binders to see the copy.

Note: the Copy link will not show up if the author of the binder has decided that they don't want their binder copied.

copy from within a binder

Present a Binder

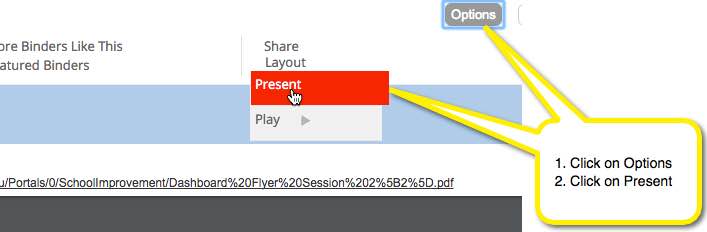
The present feature lets you show a binder without any of the distractions of the top bar. To do this from within a binder by click on Options > Layout > Present.

Selecting Embed from binder

Search Engine Optimization

LiveBinders created with a free account are not spidered by search engines. If you would like your binders to be available to search engines, you can either subscribe to LiveBinders or fill out this form.

Please see our search engine optimization page for more information on how to make your binders search engine friendly.

Create a Shelf

Create New Shelf

In addition to your account shelves, you can also create a shelf to organize your binders with other people's binders. These customized shelves can be private or public.

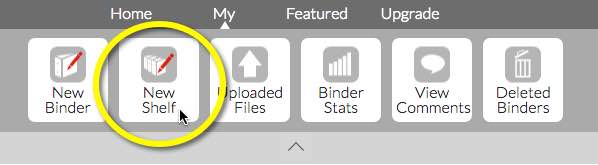
Here are three ways you can create a customized shelf:

  1. From the My page click on the New Shelf icon in the dashboard above your binders.
  2. From within a binder on the top line, click on Options > Add to Shelf.

  3. Add to Shelf from inside a binder
  4. From the Options menu located below any binder icon on a shelf, click on Add to Shelf to add that binder to a new shelf.
Add to Shelf from Shelf

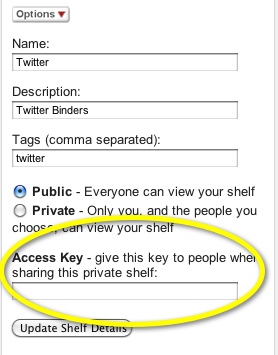
Give your shelf a name, description, and tags. This will help you and other people find your shelves within LiveBinders. If your shelf is public, people can also search for it from Google.

Then determine if you want your shelf to be public or private. If you want to share a private binder, you must create an access key. Like a private binder, only those with the access key will be able to view your private shelf.

Add a Binder to a Shelf

You can add anyone's public or private binder to your private or public custom shelves. However, if an author has chosen to restrict this access, you will not be able to add that binder to your shelf.

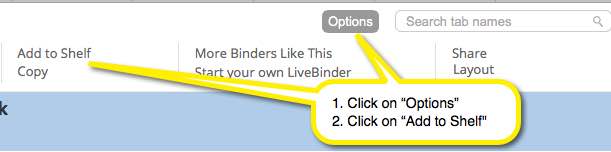
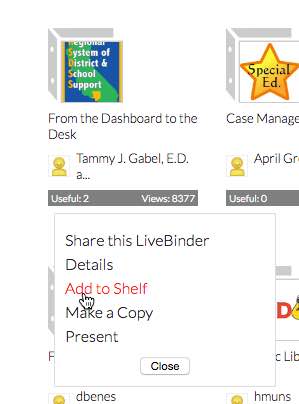
There are two ways to add binders to your shelf:

  1. From the featured page or another shelf, mouse over the binder to see the Options menu and click on Add to Shelf. You will be given the option to add it to a pre-existing shelf or to add it to a new blank shelf.
  2. From within the binder you are viewing, click on the Options menu in the top bar of the binder. Click on Add to Shelf.

Add to Shelf New Shelf Add to Shelf New Shelf

If "Add to Shelf" is missing - the owner has disabled the ability to add their binder to a shelf. You can contact the owner to request access or you can copy and paste the binder link to a tab in one of your binders. You can also bookmark the binder in your browsers' Favorites folder.

Remove a Binder from a Shelf

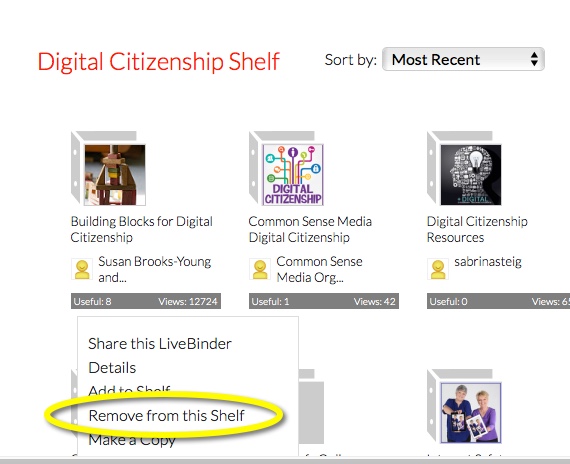
From your shelf, mouse over the binder to see the Options menu and click on Remove from this Shelf. The page will refresh and remove your binder.

Remove a Binder from a Shelf

Share a Shelf

Share Shelf

On your My page, all of your binders are organized on "shelves." There are currently two kinds of shelves in your account: those that can't be shared and those that can be shared.

  1. Private account shelves can't be shared: "All my binders," "All my private binders," and "Assigned binders."
  2. Your public shelf and any shelf you create are shareable: "All my public binders," and any shelf you create with the "Add to Shelf" link or "Start a blank shelf" link.

Sharing Public Shelves:

Like a binder, a shelf has a URL that you can share.

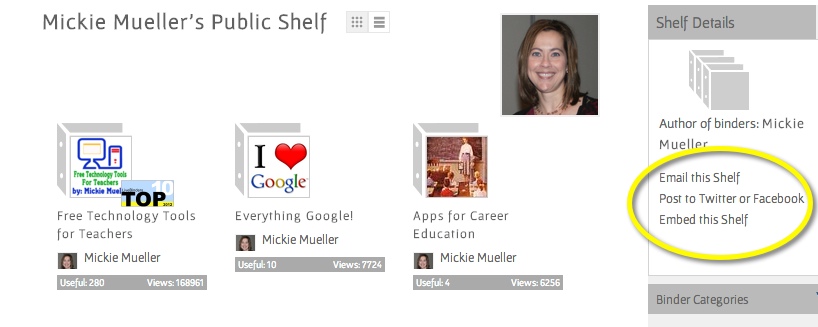
To share your public shelves:

  1. Go to the shelf by clicking on it in the list to the left under My
  2. Click on the Options button
  3. Click on Share and you will see a URL that you can copy and paste into email
Sharing a public shelf

You will see all their binders. You can then tweet, put the link on Facebook, or copy and paste the link into an email:

Viewing a public shelf

Sharing Private Custom Shelves

Access key for shelf

To share your private customized shelves, you will need to create and provide an access key for your shelf. Like your private binders, this will allow anyone with the access key and the link to view your private shelf.

To set your access key for your shelf,

  1. Click on your shelf from your My page
  2. Click on the Options menu
  3. Go to Change Settings and type an access key in the box labeled Access Key

To share your private customized shelf, click on the Share and Embed link from the Options drop down menu located under Shelf Details. Copy the link and email both the link and the access key to the person with whom you would like to share your binder.

Embed a Shelf

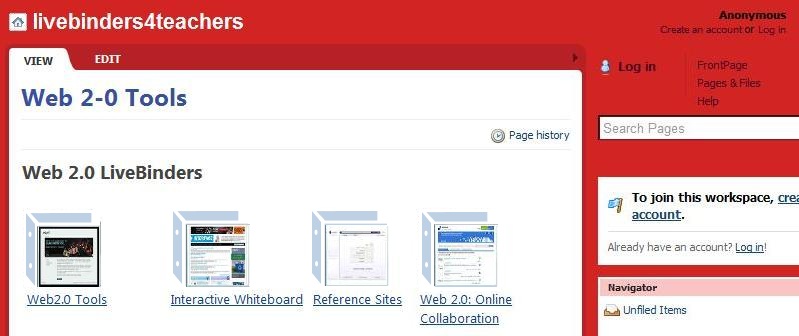
You can embed a public shelf in most blogs and wikis (except the hosted version of Wordpress.)

First find the shelf you want to embed by clicking on an author name or on one of your shelves. Then click on the Options button in Shelf Details and then the Embed link.

Click on 'Embed this shelf' Embed a mini shelf in your blog or website

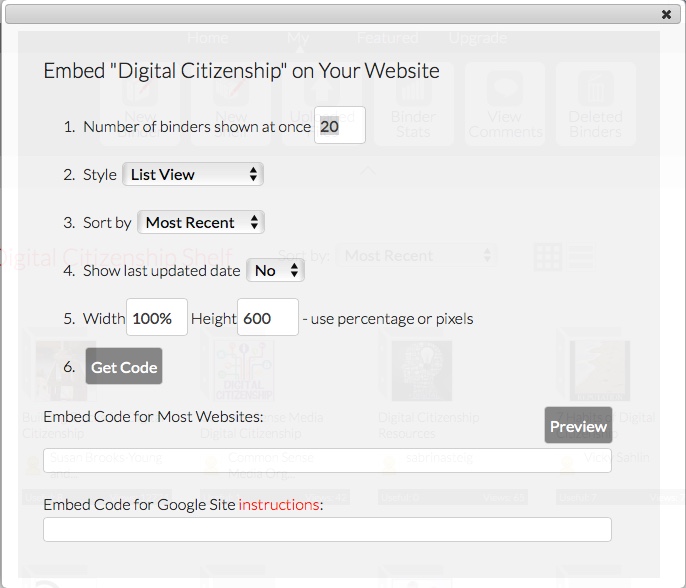
You can select the following different options for embedding the shelf:

  1. The binders will show up in an iframe box, if there are many binders on a shelf you will want multiple shelf pages. Use this number to decide how many binders you would like on a page.
  2. You can select List View with a very small binder icon, Tile View with a medium sized binder icon, or Tile View with a large binder icon. Click on the "Preview" button to see what these different options look like
  3. Choose the sort order for your shelf
  4. Show the last updated date - normally the shelf will just show binder names, but if you would like the last updated date to be included, please select "yes" on this option
  5. Select the size of the iframe or box for your shelf. You can use pixels or percentages
  6. Click on Get Code and copy the code in the box to the appropriate place on your website.

Embed a Shelf in a Google Site

Embedding a shelf in a Google Site page is a little complex. This video will walk you through the details.

Here are step-by-step instructions:

  1. Go to your LiveBinders shelf page
  2. Click on Options on the left side
  3. Click on Embed
  4. Follow the instructions above to customize your embed code
  5. Go to your Google Site
  6. Go into Edit mode on the page
  7. Click on Insert in the upper left
  8. Select More Gadgets
  9. Search for iFrame in the search gadgets box
  10. Select the iFrame Gadget
  11. Paste the URL from your shelf in the URL box
  12. Adjust the width and height as you see fit
  13. Click on OK

Change the Name/Description of a Shelf

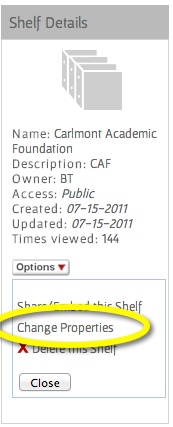
To change the name of a shelf, just click on the Options button under Shelf Details and then click on Change Settings to bring up a menu to change your shelf settings.

Change Shelf Settings

Delete a Shelf

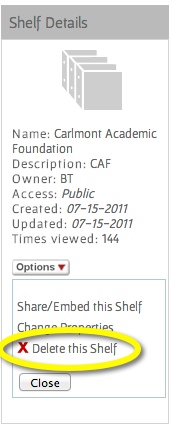
To delete a shelf, just click on the Options button under Shelf Details and then click on Delete this Shelf.

Delete Shelf

Download a Binder

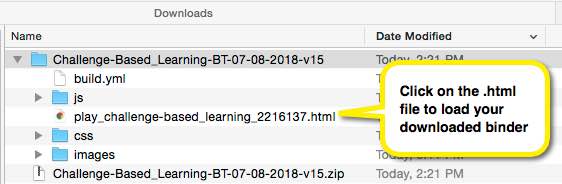
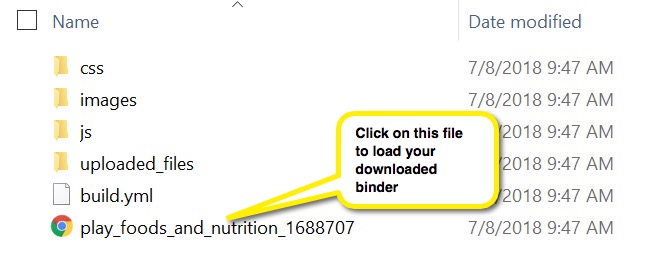
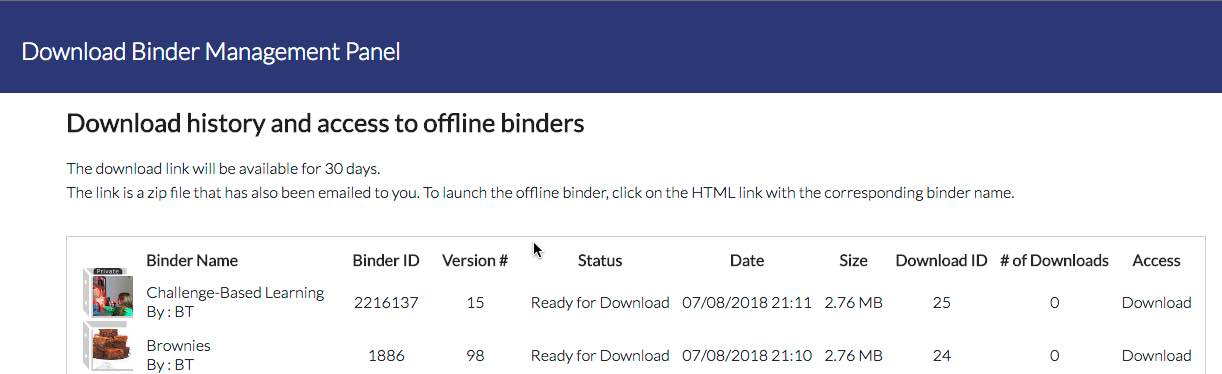
Downloading a binder is a Pro and Pro EDU plan feature that lets you create an offline version (not editable) of your binder. If you have uploaded files to your binder and want a back up copy on your desktop, or if you need to present material in areas where they do not have wifi coverage, you can use this offline version of the binder. Your download copy of the binder is provided in a zip file format. Learn more.

How to Download a Binder

  1. From the LiveBinders shelf
  2. Mouse over the binder you want to download and click on Options
  3. Click on Download Binder
  4. There are two ways you can get the downloaded binder
    1. Wait for an email notification with the link to your zip file
    2. Go to the download manager by mousing over your username and selecting Downloaded Binders
  5. Save your zip file and then extract it
  6. Go to the extracted folder and click on the .html file with the name of your binder. This will launch the downloaded version of your binder in your browser in play mode.

Note: Once a binder is downloaded, the downloaded copy of your binder can't be edited. If you are playing your binder offline, none of the web links in your binder will work until you have a wifi connection. All of the uploaded files and the binder table of contents and tab search will work as usual.

Downloaded, extracted binder contents on Mac
Extracted binder contents on a Mac
Downloaded, extracted binder contents on PC
Extracted binder contents on a PC
Download management panel

Troubleshooting problems with download binder

If you have a problem with receiving a zip file with your download copy, please check for the following:

  1. Make sure you don't have special characters in either your file names that are uploaded to the binder or tab names inside the binder
  2. Make sure there are no broken links in your tabs

Troubleshooting your download binder zip file

If you have trouble unzipping your file from your file folder, then download WinZip to unzip your file.

NOTE: A very long file name that has been uploaded to your binder may cause problems with certain unzip applications. Try using WinZip to unzip your binder or try uploading a version of the file with a shorter file name.

Add Comments

You need to be logged into LiveBinders to add comments.

  • Once you are logged into LiveBinders click on the Options button in the top line of the binder
  • Click on the Comments
  • Type your comment and click on "Submit"
Add comments to a binder

Search Tab Names Inside a Binder

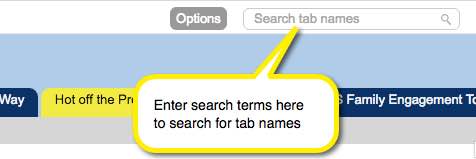
The viewers of your binder can search tab names by using the search bar at the top. They do not need to have a LiveBinders account to search for tab names.

Search bar at top of binder

Print Text

  1. Word Doc or PDF file: If the text document is a MS Word document or PDF file, you can use the MS Word or PDF application to print the document - those documents in their application will automatically appear either in your binder or as downloads on your computer. Look for the "print" icon from the MS Word or from the PDF menu. This is the easiest way to print text and is another reason to upload files into the binder.

  2. Text within LiveBinders:
    • Chrome and IE: Right click on the text and select Print from the drop-down menu.
    • Safari: Right click on the text and select Print Frame from the drop-down menu.
    • Firefox: Right click on the text and select This Frame then Print Frame from the drop-down menu.

Auto-save

Auto-save is designed to automatically save your binder. If auto-save is taking too long, or seems to be saving too often, there is one of two possible problems:

  1. Your connection is slow or spotty
  2. Your binder is too large

It isn't the number of tabs that can make a binder too large, but more often something in the text frames causing the problem. If you copy/paste an image into a text frame, this will cause the binder to be too large, or if you copy/paste text from Microsoft Word.

If you are seeing a problem with slow auto-saves, please contact support immediately and provide a link to your binder.
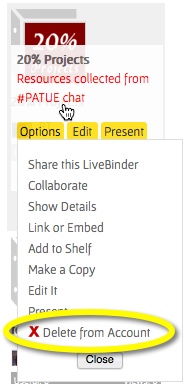
Delete a Binder

To delete a binder:

  1. Go to your My page
  2. Mouse over the binder you wish to delete and click on Options
  3. Click on Delete from Account

Your binder will be deleted, but will be saved for 30 days in case you want to undelete it.

screenshot of 'Delete' from the options menu

Undelete a Binder

screenshot of 'Undelete' from the Dashboard

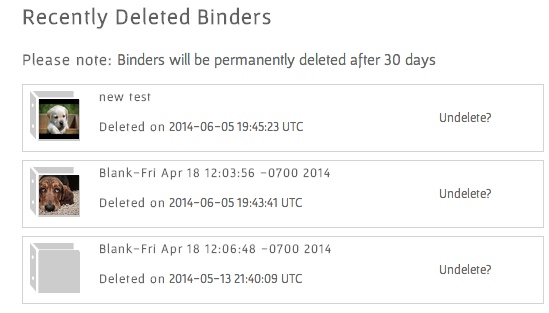
Your deleted binders are saved for 30 days and are accessible from the deleted binders page.

To access your deleted binders:

  1. Go to your My page
  2. Click on the Deleted Binders link on your dashboard. That will take you to a page that has all your deleted binders for the past 30 days
  3. To undelete a binder, just click on the Undelete link next to the desired binder on the right side

Your binder will appear back on your My shelf. Please note that the access will be "Private - Copy Disabled". You may need to make your binder public again, if that is what you wanted.

screenshot of 'Recently Deleted Binders' page

Delete Files

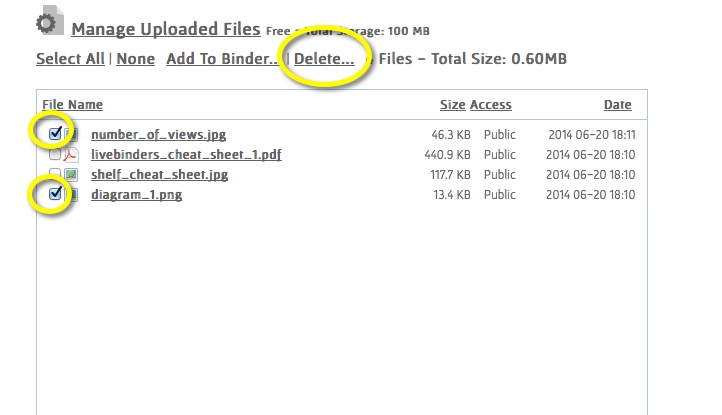
Deleting uploaded files in a binder does not delete them from your account.

  1. To delete them from your account, you need to go to the file manager by hovering over your username and clicking on My Uploaded Files
  2. Upload files on the dashboard
  3. You will see all your files, and their sizes, listed under Manage Uploaded Files. Put a checkbox next to any file that you wish to delete
  4. Click on the Delete link above the files.

Those files will be removed and you will regain the space that they were using in your account.

Screenshot of delete files

Team Shelf

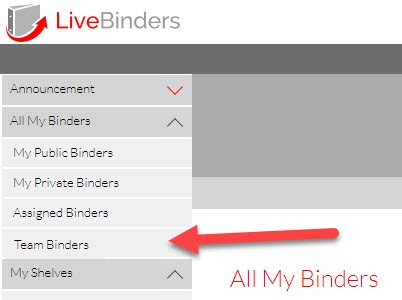
The Team Shelf is private library of binders that is available with the Team subscription account. The Team plan allows members to mark binders with the access of "Team Copyable" or "Team Copy Disabled." You can find the Team Shelf under All My Binders drop down menu located to the left of your My Binders page.

Location of team shelf